Account Setting - User Management and Access Rights
Account Settings – User Management
As the administrator, you will need to set up and maintain the iLeasePro user community within your company.
The features in Accounting Setting – User include;
- Adding User information to access iLeasePro
- Deleting a User from access to iLeasePro
- Setting a User up as an Administrator or User
- Setting up the access rights and entitlements of a User
- Allow/Restrict access to the primary features
- Allow/Restrict access to the lease management features
- Allow/Restrict access to Portfolio defined Groups and SubGroups
Adding a New User
To add a new user to iLeasePro click on the Add New button as indicated below
User Info
The Add A New User page will be displayed. Enter the user’s First Name, Last Name and Email Address.
The Email Address you enter will be used to send an invite to the user, so it is important that it is the correct email.
User Type
Set the User Type of the current User. Select whether this user is an Administrator or User of iLeasePro for your company.
- If the user is designated as Administrator, he/she will have all access to iLeasePro with no restrictions. This designation should be given out specifically to users that will manage the iLeasePro solution.
- If the user is designated as User, additional fields will be displayed to allow you to set access or restrictions to the different features and pages within iLeasePro.
Setting up the access rights and entitlements of a User
iLeasePro has a full entitlements feature to allow or restrict users from accessing key features and specific data.
Sidebar and Lease Tab links the User can access
The Lease feature is not available for restriction – all users will have access to the Lease features. To restrict access to specific Lease features select/deselect the appropriate Lease tabs.
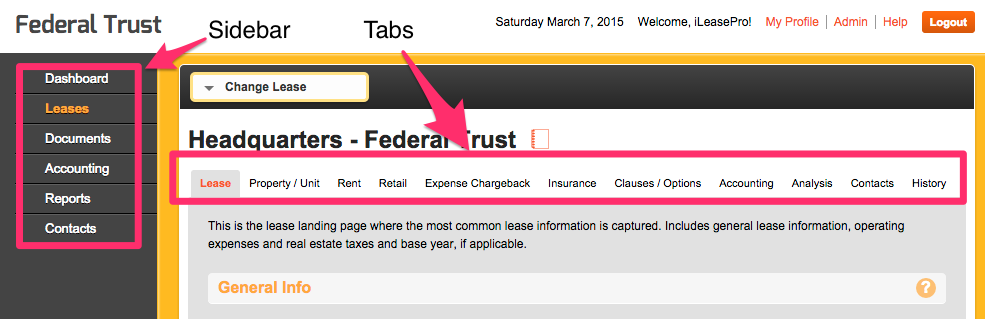
To allow access to all Sidebar features, click on “Add all sidebar links”
To restrict access to all Sidebar features, click on “Remove all sidebar links”
To allow access to all Lease tabs, click on “Add all lease tabs”
To restrict access to all Lease tabs, click on “Remove all lease tabs”
To allow access to the specific features for the current user select on the check box
To restrict access to the specific features for the current user deselect on the check box
Portfolio Setup - User Groups and SubGroups
If your plan subscription includes the Portfolio Setup feature, users can be added or restricted from the Groups that have been defined.
To allow access to the specific features for the current user select on the check box next to the Group or SubGroup to allow access to
To restrict access to the specific features for the current user deselect on the check box next to the Group or SubGroup to restrict access to
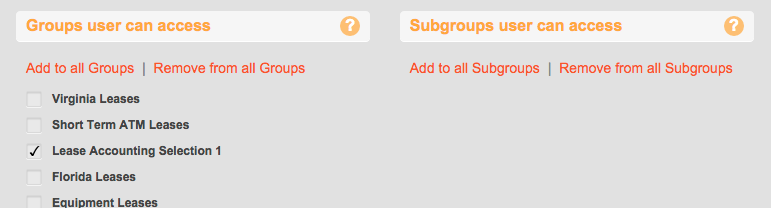
An example of how this can be used would be; you have a locations in different geographical areas and would like to organize the leases by these different areas. Let's say by state. You would create a group for each each state and for each user that you would like to give access to, say Virginia Leases, you would select the checkbox next to "Virginia Leases" for the current user. This would give full access to the user for all leases that have been included in the Virginia Lease group. And for the reverse, if you had users that you would not like to give access to Virginia leases, you would uncheck the box next to Virginia leases and that user would not have access to any of the Virginia Leases.
Note that through the iLeasePro solution all visuals and summary information will be consolidated based on the groups selected. This information would include the Dashboard Summary and Graphs and the reports that are accessible.